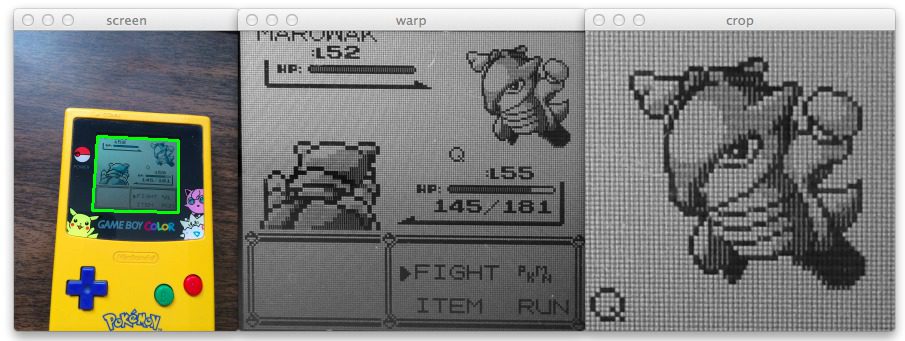
Figure 1: Performing a perspective transformation using Python and OpenCV on the Game Boy screen and cropping out the Pokemon.
We’re getting closer to finishing up our real-life Pokedex!
In my previous blog post, I showed you how to find a Game Boy screen in an image using Python and OpenCV.
This post will show you how to apply warping transformations to obtain a “birds-eye-view” of the Game Boy screen. From there, we will be able to crop out the actual Pokemon and feed it into our Pokemon identification algorithm.
Looking for the source code to this post?
Jump right to the downloads section.
OpenCV and Python versions:
This example will run on Python 2.7 and OpenCV 2.4.X.
Previous Posts
This post is part of an on-going series of blog posts on how to build a real-life Pokedex using Python, OpenCV, and computer vision and image processing techniques. If this is the first post in the series you are reading, definitely check it out! But after you give it a read, be sure to go back and review the previous posts — there is a TON of awesome computer vision and image processing content in there.
Finally, if you have have any questions, feel free to shoot me an email. I would be happy to chat.
- Step 1: Building a Pokedex in Python: Getting Started (Step 1 of 6)
- Step 2: Building a Pokedex in Python: Scraping the Pokemon Sprites (Step 2 of 6)
- Step 3: Building a Pokedex in Python: Indexing our Sprites using Shape Descriptors (Step 3 of 6)
- Step 4: Building a Pokedex in Python: Finding the Game Boy Screen (Step 4 of 6)
Building a Pokedex in Python: OpenCV Perspective Transform Example
When we wrapped up the previous post on building a Pokedex in Python, we were able to find our Game Boy screen by applying edge detection, finding contours, and then approximating the contours, like this:
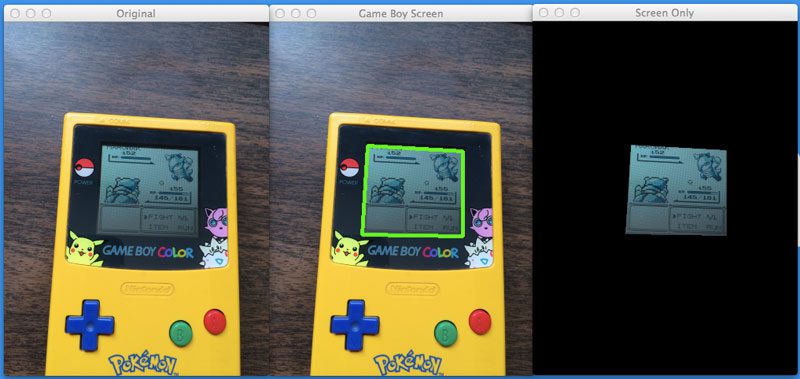
Figure 2: Finding a Game Boy screen in an image using Python and OpenCV.
However, you may notice that the Game Boy screen is slightly skewed — the screen is definitely leaning to the right.
The perspective of the screen is also wrong. Ideally, we would want to have a top-down, birds-eye-view of the Game Boy screen, as in Figure 1.
How are we going to accomplish this?
Let’s jump into some code.
We’ll be building off the code in the previous post, so if it looks like we are jumping into the middle of a file, it’s because we are.
# import the necessary packages
from pyimagesearch import imutils
from skimage import exposure
import numpy as np
import argparse
import cv2

# construct the argument parser and parse the arguments
ap = argparse.ArgumentParser()
ap.add_argument("-q", "--query", required = True,
	help = "Path to the query image")
args = vars(ap.parse_args())

# load the query image, compute the ratio of the old height
# to the new height, clone it, and resize it
image = cv2.imread(args["query"])
ratio = image.shape[0] / 300.0
orig = image.copy()
image = imutils.resize(image, height = 300)

# convert the image to grayscale, blur it, and find edges
# in the image
gray = cv2.cvtColor(image, cv2.COLOR_BGR2GRAY)
gray = cv2.bilateralFilter(gray, 11, 17, 17)
edged = cv2.Canny(gray, 30, 200)

# find contours in the edged image, keep only the largest
# ones, and initialize our screen contour
(cnts, _) = cv2.findContours(edged.copy(), cv2.RETR_TREE, cv2.CHAIN_APPROX_SIMPLE)
cnts = sorted(cnts, key = cv2.contourArea, reverse = True)[:10]
screenCnt = None

# loop over our contours
for c in cnts:
	# approximate the contour
	peri = cv2.arcLength(c, True)
	approx = cv2.approxPolyDP(c, 0.02 * peri, True)

	# if our approximated contour has four points, then
	# we can assume that we have found our screen
	if len(approx) == 4:
		screenCnt = approx
		break

# now that we have our screen contour, we need to determine
# the top-left, top-right, bottom-right, and bottom-left
# points so that we can later warp the image -- we'll start
# by reshaping our contour to be our finals and initializing
# our output rectangle in top-left, top-right, bottom-right,
# and bottom-left order
pts = screenCnt.reshape(4, 2)
rect = np.zeros((4, 2), dtype = "float32")

# the top-left point has the smallest sum whereas the
# bottom-right has the largest sum
s = pts.sum(axis = 1)
rect[0] = pts[np.argmin(s)]
rect[2] = pts[np.argmax(s)]

# compute the difference between the points -- the top-right
# will have the minumum difference and the bottom-left will
# have the maximum difference
diff = np.diff(pts, axis = 1)
rect[1] = pts[np.argmin(diff)]
rect[3] = pts[np.argmax(diff)]

# multiply the rectangle by the original ratio
rect *= ratio
On Line 51 we are are reshaping the contour that corresponds to the outline of the screen. The contour has four points, the four points of the rectangular region of the screen. We are simply reshaping the NumPy array of points to make them easier to work with.
In order to apply a perspective transformation, we need to know the top-left, top-right, bottom-right, and bottom-left corners of the contour. However, just because we have the contour that corresponds to the Game Boy screen, we have no guarantee of the order of the points. There is no guarantee that the top-left point is the first point in the contour list. It might be the second point. Or the fourth point.
To handle this problem we’ll have to impose a strict order on the points. We start on Line 52 by initializing our rectangle of shape (4, 2) to store the ordered points.
Line 56-58 handles grabbing the top-left and bottom-right points. Line 56 handles summing the (x, y) coordinates together by specifying axis=1. The top-left point will have the smallest sum (Line 57), whereas the bottom-right point will have the largest sum (Line 58).
Now we need to grab the top-right and bottom-left points on Line 63-65 by taking the difference between the (x, y) coordinates. The top-right point will have the smallest difference (Line 64), whereas the bottom-left point will have the largest difference (Line 65).
Notice how our points are now stored in an imposed order: top-left, top-right, bottom-right, and bottom-left. Keeping a consistent order is important when we apply our perspective transformation.
If you remember back to the previous post, we resized our image to make image processing and edge detection faster and more accurate. We kept track of this resizing ratio for a good reason — when we crop out of Game Boy screen, we want to crop out the original Game Boy screen, not the smaller, resized one.
In oder to extract the original, large Game Boy screen, we multiply our rect by the ratio, thus transforming the points to the original image size.
Next, we need to calculate the size of the Game Boy screen so that we can allocate memory to store it:
# import the necessary packages
from pyimagesearch import imutils
from skimage import exposure
import numpy as np
import argparse
import cv2

# construct the argument parser and parse the arguments
ap = argparse.ArgumentParser()
ap.add_argument("-q", "--query", required = True,
	help = "Path to the query image")
args = vars(ap.parse_args())

# load the query image, compute the ratio of the old height
# to the new height, clone it, and resize it
image = cv2.imread(args["query"])
ratio = image.shape[0] / 300.0
orig = image.copy()
image = imutils.resize(image, height = 300)

# convert the image to grayscale, blur it, and find edges
# in the image
gray = cv2.cvtColor(image, cv2.COLOR_BGR2GRAY)
gray = cv2.bilateralFilter(gray, 11, 17, 17)
edged = cv2.Canny(gray, 30, 200)

# find contours in the edged image, keep only the largest
# ones, and initialize our screen contour
(cnts, _) = cv2.findContours(edged.copy(), cv2.RETR_TREE, cv2.CHAIN_APPROX_SIMPLE)
cnts = sorted(cnts, key = cv2.contourArea, reverse = True)[:10]
screenCnt = None

# loop over our contours
for c in cnts:
	# approximate the contour
	peri = cv2.arcLength(c, True)
	approx = cv2.approxPolyDP(c, 0.02 * peri, True)

	# if our approximated contour has four points, then
	# we can assume that we have found our screen
	if len(approx) == 4:
		screenCnt = approx
		break

# now that we have our screen contour, we need to determine
# the top-left, top-right, bottom-right, and bottom-left
# points so that we can later warp the image -- we'll start
# by reshaping our contour to be our finals and initializing
# our output rectangle in top-left, top-right, bottom-right,
# and bottom-left order
pts = screenCnt.reshape(4, 2)
rect = np.zeros((4, 2), dtype = "float32")

# the top-left point has the smallest sum whereas the
# bottom-right has the largest sum
s = pts.sum(axis = 1)
rect[0] = pts[np.argmin(s)]
rect[2] = pts[np.argmax(s)]

# compute the difference between the points -- the top-right
# will have the minumum difference and the bottom-left will
# have the maximum difference
diff = np.diff(pts, axis = 1)
rect[1] = pts[np.argmin(diff)]
rect[3] = pts[np.argmax(diff)]

# multiply the rectangle by the original ratio
rect *= ratio

# now that we have our rectangle of points, let's compute
# the width of our new image
(tl, tr, br, bl) = rect
widthA = np.sqrt(((br[0] - bl[0]) ** 2) + ((br[1] - bl[1]) ** 2))
widthB = np.sqrt(((tr[0] - tl[0]) ** 2) + ((tr[1] - tl[1]) ** 2))

# ...and now for the height of our new image
heightA = np.sqrt(((tr[0] - br[0]) ** 2) + ((tr[1] - br[1]) ** 2))
heightB = np.sqrt(((tl[0] - bl[0]) ** 2) + ((tl[1] - bl[1]) ** 2))

# take the maximum of the width and height values to reach
# our final dimensions
maxWidth = max(int(widthA), int(widthB))
maxHeight = max(int(heightA), int(heightB))

# construct our destination points which will be used to
# map the screen to a top-down, "birds eye" view
dst = np.array([
	[0, 0],
	[maxWidth - 1, 0],
	[maxWidth - 1, maxHeight - 1],
	[0, maxHeight - 1]], dtype = "float32")

# calculate the perspective transform matrix and warp
# the perspective to grab the screen
M = cv2.getPerspectiveTransform(rect, dst)
warp = cv2.warpPerspective(orig, M, (maxWidth, maxHeight))
Let’s take this code apart and see what’s going on:
- Line 72: Here we are unpacking our
rectand grabbing the top-left, top-right, bottom-right, and bottom-left points, respectively. - Line 73: In order to determine the width of the image, we compute the distance between the x coordinates of the bottom-right and bottom-left points.
- Line 74: Similarly, we compute the distance between the x coordinates of the top-right and top-left points.
- Lines 77 and 78: Just like we computed the distance between the x coordinate points, we now need to do the same for the y coordinate points.
- Lines 82 and 83: Now that we have our distances, we take the maximum of
widthAandwidthBto determine the width of our transformed image. We then repeat the process forheightAandheightBto determine the dimensions of the new image. - Lines 87-91: Remember how I said the order of the points is important? In order to compute the birds-eye-view of the Game Boy screen we need to construct a matrix
dstto handle the mapping. The first entry in dst is the origin of the image — the top-left corner. We then specify the top-right, bottom-right, and bottom-left points based on our calculated width and height. - Line 95: To compute the perspective transformation, we need the actual transformation matrix. This matrix is calculated by making a call to
cv2.getPerspectivetransformation and passing in the coordinates of the Game Boy screen in the original image, followed by the four points we specified for our output image. In return, we are given our transformation matrixM. - Line 96: Finally, we can apply our transformation by calling the
cv2.warpPerspectivefunction. The first parameter is our original image that we want to warp, the second is our transformation matrixMobtained fromcv2.getPerspective, and the final parameter is a tuple, used to indicate the width and height of the output image.
If all goes well, we should now have a top-down/birds-eye-view of our Game Boy screen:
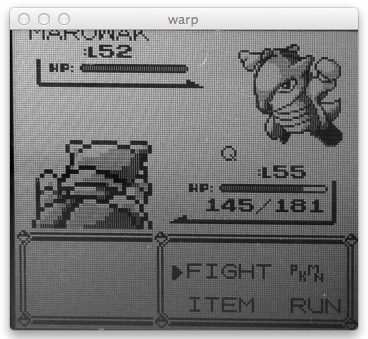
Figure 2: Obtaining a top-down/birds-eye-view of an image using Python, OpenCV, and perspective warping and transformations.
But we aren’t done yet!
We still need to crop out the actual Pokemon from the top-right portion of the screen.
Furthermore, you’ll notice that our Marowak seems to be a bit “shadowy” and the screen of the Game Boy itself is darker than we would like it to be. We need to see if we can re-scale the intensity of our image to help mitigate this shadow and make it easier to extract the contour of the Marowak, later allowing us to compute shape features over the Pokemon outline.
# import the necessary packages
from pyimagesearch import imutils
from skimage import exposure
import numpy as np
import argparse
import cv2

# construct the argument parser and parse the arguments
ap = argparse.ArgumentParser()
ap.add_argument("-q", "--query", required = True,
	help = "Path to the query image")
args = vars(ap.parse_args())

# load the query image, compute the ratio of the old height
# to the new height, clone it, and resize it
image = cv2.imread(args["query"])
ratio = image.shape[0] / 300.0
orig = image.copy()
image = imutils.resize(image, height = 300)

# convert the image to grayscale, blur it, and find edges
# in the image
gray = cv2.cvtColor(image, cv2.COLOR_BGR2GRAY)
gray = cv2.bilateralFilter(gray, 11, 17, 17)
edged = cv2.Canny(gray, 30, 200)

# find contours in the edged image, keep only the largest
# ones, and initialize our screen contour
(cnts, _) = cv2.findContours(edged.copy(), cv2.RETR_TREE, cv2.CHAIN_APPROX_SIMPLE)
cnts = sorted(cnts, key = cv2.contourArea, reverse = True)[:10]
screenCnt = None

# loop over our contours
for c in cnts:
	# approximate the contour
	peri = cv2.arcLength(c, True)
	approx = cv2.approxPolyDP(c, 0.02 * peri, True)

	# if our approximated contour has four points, then
	# we can assume that we have found our screen
	if len(approx) == 4:
		screenCnt = approx
		break

# now that we have our screen contour, we need to determine
# the top-left, top-right, bottom-right, and bottom-left
# points so that we can later warp the image -- we'll start
# by reshaping our contour to be our finals and initializing
# our output rectangle in top-left, top-right, bottom-right,
# and bottom-left order
pts = screenCnt.reshape(4, 2)
rect = np.zeros((4, 2), dtype = "float32")

# the top-left point has the smallest sum whereas the
# bottom-right has the largest sum
s = pts.sum(axis = 1)
rect[0] = pts[np.argmin(s)]
rect[2] = pts[np.argmax(s)]

# compute the difference between the points -- the top-right
# will have the minumum difference and the bottom-left will
# have the maximum difference
diff = np.diff(pts, axis = 1)
rect[1] = pts[np.argmin(diff)]
rect[3] = pts[np.argmax(diff)]

# multiply the rectangle by the original ratio
rect *= ratio

# now that we have our rectangle of points, let's compute
# the width of our new image
(tl, tr, br, bl) = rect
widthA = np.sqrt(((br[0] - bl[0]) ** 2) + ((br[1] - bl[1]) ** 2))
widthB = np.sqrt(((tr[0] - tl[0]) ** 2) + ((tr[1] - tl[1]) ** 2))

# ...and now for the height of our new image
heightA = np.sqrt(((tr[0] - br[0]) ** 2) + ((tr[1] - br[1]) ** 2))
heightB = np.sqrt(((tl[0] - bl[0]) ** 2) + ((tl[1] - bl[1]) ** 2))

# take the maximum of the width and height values to reach
# our final dimensions
maxWidth = max(int(widthA), int(widthB))
maxHeight = max(int(heightA), int(heightB))

# construct our destination points which will be used to
# map the screen to a top-down, "birds eye" view
dst = np.array([
	[0, 0],
	[maxWidth - 1, 0],
	[maxWidth - 1, maxHeight - 1],
	[0, maxHeight - 1]], dtype = "float32")

# calculate the perspective transform matrix and warp
# the perspective to grab the screen
M = cv2.getPerspectiveTransform(rect, dst)
warp = cv2.warpPerspective(orig, M, (maxWidth, maxHeight))

# convert the warped image to grayscale and then adjust
# the intensity of the pixels to have minimum and maximum
# values of 0 and 255, respectively
warp = cv2.cvtColor(warp, cv2.COLOR_BGR2GRAY)
warp = exposure.rescale_intensity(warp, out_range = (0, 255))

# the pokemon we want to identify will be in the top-right
# corner of the warped image -- let's crop this region out
(h, w) = warp.shape
(dX, dY) = (int(w * 0.4), int(h * 0.45))
crop = warp[10:dY, w - dX:w - 10]

# save the cropped image to file
cv2.imwrite("cropped.png", crop)

# show our images
cv2.imshow("image", image)
cv2.imshow("edge", edged)
cv2.imshow("warp", imutils.resize(warp, height = 300))
cv2.imshow("crop", imutils.resize(crop, height = 300))
cv2.waitKey(0)
The first thing we’ll do is convert our warped image to grayscale on Line 100. Then, we make use of the skimage Python library. We make a call to the rescale_intensity method in the exposure sub-package. This method takes our warped image and then re-scales the gray pixel intensities by finding the minimum and maximum values. The minimum value then becomes black (a value of 0) and the maximum value then becomes white (a value of 255). All pixels that fall into that range are scaled accordingly.
The output of this re-scaling can be seen below:
Figure 3: Re-scaling the intensity of pixels using scikit-image.
Notice how that shadow region is much less apparent.
From here, all we need is some simple cropping.
We grab the height and width of the warped Game Boy screen on Line 106 and then determine a region that is 40% of the width and 45% of the height on Line 107 — the Pokemon that we want to identify will lie within this region of the image:
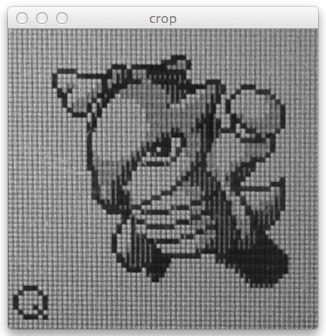
Figure 4: Cropping the Pokemon from our Game Boy screen using Python and OpenCV.
Note: I determined these percentages empirically by trial and error. There is no fancy computer vision magic going on. Just your standard testing and debugging to find the correct percentages.
We crop the Pokemon from the Game Boy screen on Line 108 and write it to file on Line 111. In the next (and final) blog post in this series we’ll use this cropped image to perform the actual identification of the Pokemon.
Finally, Lines 114-118 just show us the results of our labor:
To execute our script to the Pokemon in the Game Boy screen, simply execute the following command:
$ python find_screen.py --query queries/query_marowak.jpg
Summary
In this blog post we applied perspective and warping transformations using Python and OpenCV. We utilized the cv2.getPerspectiveTransform and cv2.warpPerspective functions to accomplish these transformations. We then reviewed a perspective transform OpenCV example.
We applied these techniques to obtain a top-down/birds-eye-view of our Game Boy screen, allowing us to crop out the Pokemon we want to identify. This example demonstrated the OpenCV perspective transform.
Finally, we used scikit-image to rescale the pixel intensity of the grayscale cropped image.
My next post will wrap up this series of post and tie everything together. We will take our cropped Pokemon and then run it through our identification algorithm.
From there, we’ll have a real-life working Pokedex!
Downloads:
The post Building a Pokedex in Python: OpenCV and Perspective Warping (Step 5 of 6) appeared first on PyImageSearch.