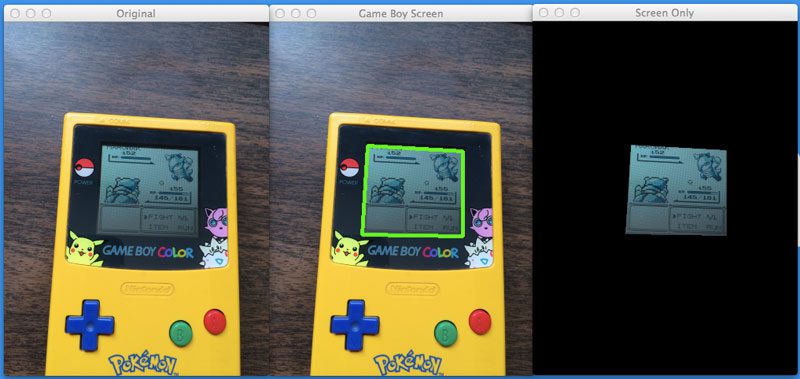
Figure 1: Finding a Game Boy screen in an image using Python and OpenCV.
Quick question.
How does a Pokedex work?
Well, you simply point it a Pokemon, the Pokedex examines its physical characteristics, and the Pokemon is identified instantly.
Looking for the source code to this post?
Jump right to the downloads section.
In this case, our smartphone camera is our “Pokedex”. We point our smartphone at our Game Boy, snap a photo of it, and our rival Pokemon is identified (if you don’t believe me, you can see my Pokedex in action by watching this YouTube clip).
However, there is a lot of information in our image that we don’t need.
We don’t need the shell of the Game Boy case. We don’t need the A, B, up, down, left, right, or start or select buttons. And we certainly don’t care about the background our image was photographed on.
All we care about is the Game Boy screen.
Because once we find that Game Boy screen, we can crop out the Pokemon, and perform the identification.
In this post I’ll show you how to automatically find a Game Boy screen in an image using nothing but Python and OpenCV. Specifically, we’ll be using the OpenCV contours functionality and the findContours function in the cv2 package.
Ready?
Here we go.
OpenCV and Python versions:
This example will run on Python 2.7 and OpenCV 2.4.X.
Previous Posts
This post is part of an on-going series of blog posts on how to build a real-life Pokedex using Python, OpenCV, and computer vision and image processing techniques. If this is the first post in the series that you are reading, definitely take the time to read through it and check it out.
Being able to find a Game Boy screen in an image isn’t just cool, it’s super practical. I can think of 10-15 different ways to build a small mobile app business using nothing but Game Boy screenshots and mobile technology, such as smartphones.
Sound interesting? Don’t be shy. Send me a message and we can chat some more.
Anyway, after you read this post, go back to the previous posts in this series for some added context and information.
- Step 1: Building a Pokedex in Python: Getting Started (Step 1 of 6)
- Step 2: Building a Pokedex in Python: Scraping the Pokemon Sprites (Step 2 of 6)
- Step 3: Building a Pokedex in Python: Indexing our Sprites using Shape Descriptors (Step 3 of 6)
Building a Pokedex in Python: Finding the Game Boy Screen
Before we can find the Game Boy screen in an image, we first need an image of a Game Boy:
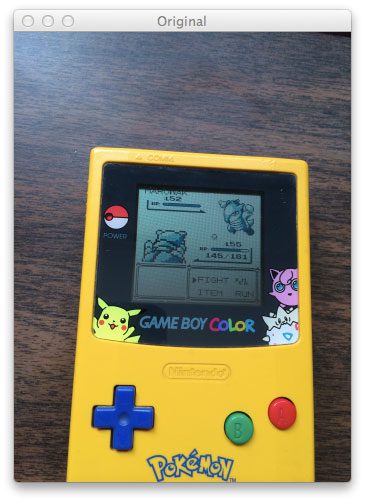
Figure 2: Our original Game Boy query image. Our goal is to find the screen in this image.
By the way, if you want the raw, original image, be sure to download the source code at the bottom of this post. I’ve thrown in my FREE 11-page Image Search Engine Resource Guide PDF just to say thanks for downloading the code.
Okay, so now that we have our image, our goal is to find the screen of our Game Boy and highlight it, just as we did in the middle screenshot of Figure 1 at the top of this post.
Fire up your favorite text editor and create a new file named find_screen.py. We’re about to get our hands dirty:
# import the necessary packages
from pyimagesearch import imutils
from skimage import exposure
import numpy as np
import argparse
import cv2

# construct the argument parser and parse the arguments
ap = argparse.ArgumentParser()
ap.add_argument("-q", "--query", required = True,
	help = "Path to the query image")
args = vars(ap.parse_args())
Lines 2-6 just handle importing our packages. We’ll make use of skimage, but I won’t go over that until the next blog post in the series, so don’t worry about that for now. We’ll use NumPy like we always do, argparse to parse our command line arguments, and cv2 contains our OpenCV bindings.
We only need one command line argument: --query points to the path to where our query image is stored on disk.
If you’re wondering about imutils on Line 2, refer back to my post on Basic Image Manipulations in Python and OpenCV, where I go over resizing, rotating, and translating. The imutils.py file in the pyimagesearch module simply contains convenience methods to handle basic image processing techniques.
Next up, let’s load our query image and start processing the image:
# import the necessary packages
from pyimagesearch import imutils
from skimage import exposure
import numpy as np
import argparse
import cv2

# construct the argument parser and parse the arguments
ap = argparse.ArgumentParser()
ap.add_argument("-q", "--query", required = True,
	help = "Path to the query image")
args = vars(ap.parse_args())

# load the query image, compute the ratio of the old height
# to the new height, clone it, and resize it
image = cv2.imread(args["query"])
ratio = image.shape[0] / 300.0
orig = image.copy()
image = imutils.resize(image, height = 300)

# convert the image to grayscale, blur it, and find edges
# in the image
gray = cv2.cvtColor(image, cv2.COLOR_BGR2GRAY)
gray = cv2.bilateralFilter(gray, 11, 17, 17)
edged = cv2.Canny(gray, 30, 200)
On Line 16 we load our query image off disk. We supplied the path to the query image using the --query command line argument.
In order to make our processing steps faster, we need to resize the image. The smaller the image is, the faster it is to process. The tradeoff is that if you make your image too small, then you miss out on valuable details in the image.
In this case, we want our new image height to be 300 pixels. On Line 17 we compute the ratio of the old height to the new height, then we make a clone of the original image on Line 18. Finally, Line 19 handles resizing the image to a height of 300 pixels.
From there, we convert our image to grayscale on Line 23. We then blur the image slightly by using the cv2.bilateralFilter function. Bilateral filtering has the nice property of removing noise in the image while still preserving the actual edges. The edges are important since we will need them to find the screen in the Game Boy image.
Finally, we apply Canny edge detection on Line 25.
As the name suggests, the Canny edge detector finds edge like regions in our image. Check out the image below to see what I mean:
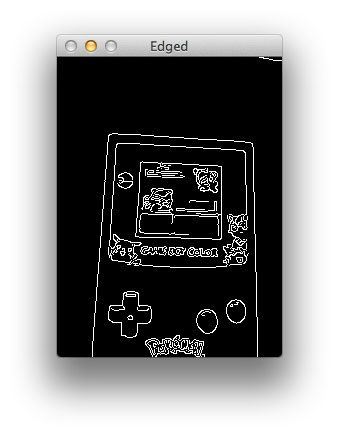
Figure 3: Applying edge detection to our Game Boy image. Notice how we can clearly see the outline of the screen.
Clearly we can see that there is a rectangular edge region that corresponds to the screen of our Game Boy. But how do we find it? Let me show you:
# import the necessary packages
from pyimagesearch import imutils
from skimage import exposure
import numpy as np
import argparse
import cv2

# construct the argument parser and parse the arguments
ap = argparse.ArgumentParser()
ap.add_argument("-q", "--query", required = True,
	help = "Path to the query image")
args = vars(ap.parse_args())

# load the query image, compute the ratio of the old height
# to the new height, clone it, and resize it
image = cv2.imread(args["query"])
ratio = image.shape[0] / 300.0
orig = image.copy()
image = imutils.resize(image, height = 300)

# convert the image to grayscale, blur it, and find edges
# in the image
gray = cv2.cvtColor(image, cv2.COLOR_BGR2GRAY)
gray = cv2.bilateralFilter(gray, 11, 17, 17)
edged = cv2.Canny(gray, 30, 200)

# find contours in the edged image, keep only the largest
# ones, and initialize our screen contour
(cnts, _) = cv2.findContours(edged.copy(), cv2.RETR_TREE, cv2.CHAIN_APPROX_SIMPLE)
cnts = sorted(cnts, key = cv2.contourArea, reverse = True)[:10]
screenCnt = None
In order to find the Game Boy screen in our edged image, we need to find the contours in the image. A contour refers to the outline or silhouette of an object — in this case, the outline of the Game Boy screen.
To find contours in an image, we need the OpenCV cv2.findContours function on Line 29. This method requires three parameters. The first is the image we want to find edges in. We pass in our edged image, making sure to clone it first. The cv2.findContours method is destructive (meaning it manipulates the image you pass in) so if you plan on using that image again later, be sure to clone it. The second parameter cv2.RETR_TREE tells OpenCV to compute the hierarchy (relationship) between contours. We could have also used the cv2.RETR_LIST option as well. Finally, we tell OpenCV to compress the contours to save space using cv2.CV_CHAIN_APPROX_SIMPLE.
In return, the cv2.findContours function gives us a list of contours that it has found.
Now that we have our contours, how are we going to determine which one corresponds to the Game Boy screen?

Well, the first thing we should do is prune down the number of contours we need to process. We know the area of our Game Boy screen is quite large with respect to the rest of the regions in the image. Line 30 handles sorting our contours, from largest to smallest, by calculating the area of the contour using cv2.contourArea. We now have only the 10 largest contours. Finally, we initialize screenCnt, the contour that corresponds to our Game Boy screen on Line 31.
We are now ready to determine which contour is the Game Boy screen:
# import the necessary packages
from pyimagesearch import imutils
from skimage import exposure
import numpy as np
import argparse
import cv2

# construct the argument parser and parse the arguments
ap = argparse.ArgumentParser()
ap.add_argument("-q", "--query", required = True,
	help = "Path to the query image")
args = vars(ap.parse_args())

# load the query image, compute the ratio of the old height
# to the new height, clone it, and resize it
image = cv2.imread(args["query"])
ratio = image.shape[0] / 300.0
orig = image.copy()
image = imutils.resize(image, height = 300)

# convert the image to grayscale, blur it, and find edges
# in the image
gray = cv2.cvtColor(image, cv2.COLOR_BGR2GRAY)
gray = cv2.bilateralFilter(gray, 11, 17, 17)
edged = cv2.Canny(gray, 30, 200)

# find contours in the edged image, keep only the largest
# ones, and initialize our screen contour
(cnts, _) = cv2.findContours(edged.copy(), cv2.RETR_TREE, cv2.CHAIN_APPROX_SIMPLE)
cnts = sorted(cnts, key = cv2.contourArea, reverse = True)[:10]
screenCnt = None

# loop over our contours
for c in cnts:
	# approximate the contour
	peri = cv2.arcLength(c, True)
	approx = cv2.approxPolyDP(c, 0.02 * peri, True)

	# if our approximated contour has four points, then
	# we can assume that we have found our screen
	if len(approx) == 4:
		screenCnt = approx
		break
On Line 34 we start looping over our 10 largest contours in the query image. Then, we approximate the contour using cv2.arcLength and cv2.approxPolyDP. These methods are used to approximate the polygonal curves of a contour. In order to approximate a contour, you need to supply your level of approximation precision. In this case, we use 2% of the perimeter of the contour. The precision is an important value to consider. If you intend on applying this code to your own projects, you’ll likely have to play around with the precision value.
Let’s stop and think about the shape of our Game Boy screen.
We know that a Game Boy screen is a rectangle.
And we know that a rectangle has four sides, thus has four vertices.
On Line 41 we check to see how many points our approximated contour has. If the contour has four points it is (likely) our Game Boy screen. Provided that the contour has four points, we then store our approximated contour on Line 43.
The reason why I was able to do this four point check was because I had only a very small number of contours to investigate. I kept only the 10 largest contours and threw the others out. The likelihood of another contour being that large with a square approximation is quite low.
Drawing our screen contours, we can clearly see that we have found the Game Boy screen:
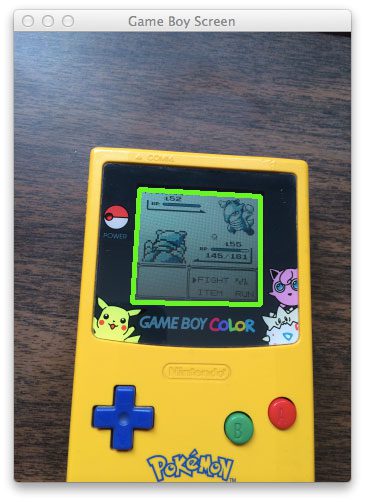
Figure 4: We have successfully found our Game Boy screen and highlighted it with a green rectangle.
If you want to draw the contours yourself, just use the following code:
cv2.drawContours(image, [screenCnt], -1, (0, 255, 0), 3)
cv2.imshow("Game Boy Screen", image)
cv2.waitKey(0)
So there you have it, Part 1 of finding the Game Boy screen.
In Step 2 of this post, I’ll show you how to perform a perspective transform on the Game Boy screen as if you were “looking down” at your Game Boy from above. Then, we’ll crop out the actual Pokemon. Take a look at the screenshot below to see what I mean:
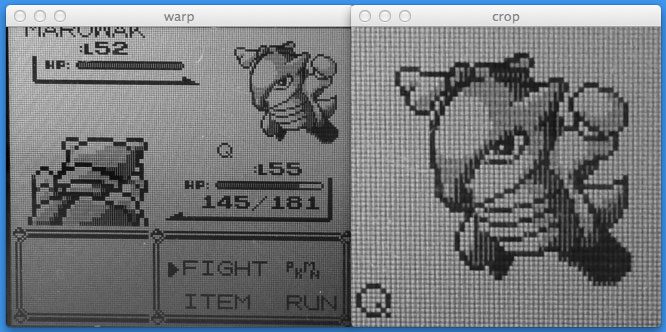
Figure 5: Performing a perspective transformation on the Game Boy screen and cropping out the Pokemon.
Summary
In this post I showed you how to find a Game Boy screen in an image using Python, OpenCV, and computer vision and image processing techniques.
We performed edge detection on our image, found the largest contours in the image using OpenCV and the cv2.findContours function, and approximated them to find their rudimentary shape. The largest contour with four points corresponds to our Game Boy screen.
Being able to find a Game Boy screen in an image isn’t just cool, it’s super practical. I can think of 10-15 different ways to build a small business using nothing but Game Boy screenshots and mobile technology, such as smartphones.
Sound interesting? Don’t be shy. Send me a message and we can chat some more.
In the next post, I’ll show how you how to apply a perspective transformation to our Game Boy screen so that we have a birds-eye-view of the image. From there, we can easily crop out the Pokemon.
Downloads:
The post Building a Pokedex in Python: Finding the Game Boy Screen (Step 4 of 6) appeared first on PyImageSearch.